Ref. plantuml.com/sequence-diagram
Download link (쓸만합니다): plantuml.com/guide
Basic examples
The sequence -> is used to draw a message between two participants. Participants do not have to be explicitly declared.To have a dotted arrow, you use -->It is also possible to use <- and <--. That does not change the drawing, but may improve readability. Note that this is only true for sequence diagrams, rules are different for the other diagrams.
Edit online@startuml Alice -> Bob: Authentication Request Bob --> Alice: Authentication Response Alice -> Bob: Another authentication Request Alice <-- Bob: Another authentication Response @enduml

Declaring participant
If the keyword participant is used to declare a participant, more control on that participant is possible.The order of declaration will be the (default) order of display.Using these other keywords to declare participants will change the shape of the participant representation:
- actor
- boundary
- control
- entity
- database
- collections
Edit online@startuml actor Foo1 boundary Foo2 control Foo3 entity Foo4 database Foo5 collections Foo6 Foo1 -> Foo2 : To boundary Foo1 -> Foo3 : To control Foo1 -> Foo4 : To entity Foo1 -> Foo5 : To database Foo1 -> Foo6 : To collections @enduml

Rename a participant using the as keyword.You can also change the background color of actor or participant.
Edit online@startuml actor Bob #red ' The only difference between actor 'and participant is the drawing participant Alice participant "I have a really\nlong name" as L #99FF99 /' You can also declare: participant L as "I have a really\nlong name" #99FF99 '/ Alice->Bob: Authentication Request Bob->Alice: Authentication Response Bob->L: Log transaction @enduml

You can use the order keyword to customize the display order of participants.
Edit online@startuml participant Last order 30 participant Middle order 20 participant First order 10 @enduml

Use non-letters in participants
You can use quotes to define participants. And you can use the as keyword to give an alias to those participants.
Edit online@startuml Alice -> "Bob()" : Hello "Bob()" -> "This is very\nlong" as Long ' You can also declare: ' "Bob()" -> Long as "This is very\nlong" Long --> "Bob()" : ok @enduml

Message to Self
A participant can send a message to itself.It is also possible to have multi-line using \n.
Edit online@startuml Alice->Alice: This is a signal to self.\nIt also demonstrates\nmultiline \ntext @enduml

Text alignment
Text of response message below the arrow
You can put the text of the response message below the arrow, with the skinparam responseMessageBelowArrow true command.
Edit online@startuml skinparam responseMessageBelowArrow true Bob -> Alice : hello Alice -> Bob : ok @enduml

TODO
Link to Text Alignment on skinparam page.
Change arrow style
You can change arrow style by several ways:
- add a final x to denote a lost message
- use \ or / instead of < or > to have only the bottom or top part of the arrow
- repeat the arrow head (for example, >> or //) head to have a thin drawing
- use -- instead of - to have a dotted arrow
- add a final "o" at arrow head
- use bidirectional arrow <->
Edit online@startuml Bob ->x Alice Bob -> Alice Bob ->> Alice Bob -\ Alice Bob \\- Alice Bob //-- Alice Bob ->o Alice Bob o\\-- Alice Bob <-> Alice Bob <->o Alice @enduml

Change arrow color
You can change the color of individual arrows using the following notation:
Edit online@startuml Bob -[#red]> Alice : hello Alice -[#0000FF]->Bob : ok @enduml

Message sequence numbering
The keyword autonumber is used to automatically add number to messages.
Edit online@startuml autonumber Bob -> Alice : Authentication Request Bob <- Alice : Authentication Response @enduml

You can specify a startnumber with autonumber //start// , and also an increment with autonumber //start// //increment//.
Edit online@startuml autonumber Bob -> Alice : Authentication Request Bob <- Alice : Authentication Response autonumber 15 Bob -> Alice : Another authentication Request Bob <- Alice : Another authentication Response autonumber 40 10 Bob -> Alice : Yet another authentication Request Bob <- Alice : Yet another authentication Response @enduml

You can specify a format for your number by using between double-quote.The formatting is done with the Java class DecimalFormat (0 means digit, # means digit and zero if absent).You can use some html tag in the format.
Edit online@startuml autonumber "<b>[000]" Bob -> Alice : Authentication Request Bob <- Alice : Authentication Response autonumber 15 "<b>(<u>##</u>)" Bob -> Alice : Another authentication Request Bob <- Alice : Another authentication Response autonumber 40 10 "<font color=red><b>Message 0 " Bob -> Alice : Yet another authentication Request Bob <- Alice : Yet another authentication Response @enduml

You can also use autonumber stop and autonumber resume //increment// //format// to respectively pause and resume automatic numbering.
Edit online@startuml autonumber 10 10 "<b>[000]" Bob -> Alice : Authentication Request Bob <- Alice : Authentication Response autonumber stop Bob -> Alice : dummy autonumber resume "<font color=red><b>Message 0 " Bob -> Alice : Yet another authentication Request Bob <- Alice : Yet another authentication Response autonumber stop Bob -> Alice : dummy autonumber resume 1 "<font color=blue><b>Message 0 " Bob -> Alice : Yet another authentication Request Bob <- Alice : Yet another authentication Response @enduml

Page Title, Header and Footer
The title keyword is used to add a title to the page.Pages can display headers and footers using header and footer.
Edit online@startuml header Page Header footer Page %page% of %lastpage% title Example Title Alice -> Bob : message 1 Alice -> Bob : message 2 @enduml

Splitting diagrams
The newpage keyword is used to split a diagram into several images.You can put a title for the new page just after the newpage keyword. This title overrides the previously specified title if any.This is very handy with Word to print long diagram on several pages.(Note: this really does work. Only the first page is shown below, but it is a display artifact.)
Edit online@startuml Alice -> Bob : message 1 Alice -> Bob : message 2 newpage Alice -> Bob : message 3 Alice -> Bob : message 4 newpage A title for the\nlast page Alice -> Bob : message 5 Alice -> Bob : message 6 @enduml

Grouping message
It is possible to group messages together using the following keywords:
- alt/else
- opt
- loop
- par
- break
- critical
- group, followed by a text to be displayed
It is possible a add a text that will be displayed into the header (except for group).The end keyword is used to close the group.Note that it is possible to nest groups.
Edit online@startuml Alice -> Bob: Authentication Request alt successful case Bob -> Alice: Authentication Accepted else some kind of failure Bob -> Alice: Authentication Failure group My own label Alice -> Log : Log attack start loop 1000 times Alice -> Bob: DNS Attack end Alice -> Log : Log attack end end else Another type of failure Bob -> Alice: Please repeat end @enduml

Notes on messages
It is possible to put notes on message using the note left or note right keywords just after the message.You can have a multi-line note using the end note keywords.
Edit online@startuml Alice->Bob : hello note left: this is a first note Bob->Alice : ok note right: this is another note Bob->Bob : I am thinking note left a note can also be defined on several lines end note @enduml

Some other notes
It is also possible to place notes relative to participant with note left of , note right of or note over keywords.It is possible to highlight a note by changing its background color.You can also have a multi-line note using the end note keywords.
Edit online@startuml participant Alice participant Bob note left of Alice #aqua This is displayed left of Alice. end note note right of Alice: This is displayed right of Alice. note over Alice: This is displayed over Alice. note over Alice, Bob #FFAAAA: This is displayed\n over Bob and Alice. note over Bob, Alice This is yet another example of a long note. end note @enduml

Changing notes shape
You can use hnote and rnote keywords to change note shapes.
Edit online@startuml caller -> server : conReq hnote over caller : idle caller <- server : conConf rnote over server "r" as rectangle "h" as hexagon endrnote @enduml

Creole and HTML
It is also possible to use creole formatting:
Edit online@startuml participant Alice participant "The **Famous** Bob" as Bob Alice -> Bob : hello --there-- ... Some ~~long delay~~ ... Bob -> Alice : ok note left This is **bold** This is //italics// This is ""monospaced"" This is --stroked-- This is __underlined__ This is ~~waved~~ end note Alice -> Bob : A //well formatted// message note right of Alice This is <back:cadetblue><size:18>displayed</size></back> __left of__ Alice. end note note left of Bob <u:red>This</u> is <color #118888>displayed</color> **<color purple>left of</color> <s:red>Alice</strike> Bob**. end note note over Alice, Bob <w:#FF33FF>This is hosted</w> by <img sourceforge.jpg> end note @enduml

Divider
If you want, you can split a diagram using == separator to divide your diagram into logical steps.
Edit online@startuml == Initialization == Alice -> Bob: Authentication Request Bob --> Alice: Authentication Response == Repetition == Alice -> Bob: Another authentication Request Alice <-- Bob: another authentication Response @enduml

Reference
You can use reference in a diagram, using the keyword ref over.
Edit online@startuml participant Alice actor Bob ref over Alice, Bob : init Alice -> Bob : hello ref over Bob This can be on several lines end ref @enduml

Delay
You can use ... to indicate a delay in the diagram. And it is also possible to put a message with this delay.
Edit online@startuml Alice -> Bob: Authentication Request ... Bob --> Alice: Authentication Response ...5 minutes later... Bob --> Alice: Good Bye ! @enduml

Text wrapping
To break long messages, you can manually add \n in your text.Another option is to use maxMessageSize setting:
Edit online@startuml skinparam maxMessageSize 50 participant a participant b a -> b :this\nis\nmanually\ndone a -> b :this is a very long message on several words @enduml

Space
You can use ||| to indicate some spacing in the diagram.It is also possible to specify a number of pixel to be used.
Edit online@startuml Alice -> Bob: message 1 Bob --> Alice: ok ||| Alice -> Bob: message 2 Bob --> Alice: ok ||45|| Alice -> Bob: message 3 Bob --> Alice: ok @enduml

Lifeline Activation and Destruction
The activate and deactivate are used to denote participant activation.Once a participant is activated, its lifeline appears.The activate and deactivate apply on the previous message.The destroy denote the end of the lifeline of a participant.
Edit online@startuml participant User User -> A: DoWork activate A A -> B: << createRequest >> activate B B -> C: DoWork activate C C --> B: WorkDone destroy C B --> A: RequestCreated deactivate B A -> User: Done deactivate A @enduml

Nested lifeline can be used, and it is possible to add a color on the lifeline.
Edit online@startuml participant User User -> A: DoWork activate A #FFBBBB A -> A: Internal call activate A #DarkSalmon A -> B: << createRequest >> activate B B --> A: RequestCreated deactivate B deactivate A A -> User: Done deactivate A @enduml

Autoactivation is possible and works with the return keywords:
Edit online@startuml autoactivate on alice -> bob : hello bob -> bob : self call bill -> bob #005500 : hello from thread 2 bob -> george ** : create return done in thread 2 return rc bob -> george !! : delete return success @enduml

Return
Command return generates a return message with optional text label.The return point is that which caused the most recent life-line activation.The syntax is return label where label if provided is any string acceptable for conventional messages.
Edit online@startuml Bob -> Alice : hello activate Alice Alice -> Alice : some action return bye @enduml

Participant creation
You can use the create keyword just before the first reception of a message to emphasize the fact that this message is actually creating this new object.
Edit online@startuml Bob -> Alice : hello create Other Alice -> Other : new create control String Alice -> String note right : You can also put notes! Alice --> Bob : ok @enduml

Shortcut syntax for activation, deactivation, creation
Immediately after specifying the target participant, the following syntax can be used:
- ++ Activate the target (optionally a #color may follow this)
- -- Deactivate the source
- ** Create an instance of the target
- !! Destroy an instance of the target
Edit online@startuml alice -> bob ++ : hello bob -> bob ++ : self call bob -> bib ++ #005500 : hello bob -> george ** : create return done return rc bob -> george !! : delete return success @enduml

Incoming and outgoing messages
You can use incoming or outgoing arrows if you want to focus on a part of the diagram.Use square brackets to denote the left "[" or the right "]" side of the diagram.
Edit online@startuml [-> A: DoWork activate A A -> A: Internal call activate A A ->] : << createRequest >> A<--] : RequestCreated deactivate A [<- A: Done deactivate A @enduml

You can also have the following syntax:
Edit online@startuml [-> Bob [o-> Bob [o->o Bob [x-> Bob [<- Bob [x<- Bob Bob ->] Bob ->o] Bob o->o] Bob ->x] Bob <-] Bob x<-] @enduml

Anchors and Duration
With teoz usage it is possible to add anchors to the diagram and use the anchors to specify duration time.
Edit online@startuml !pragma teoz true {start} Alice -> Bob : start doing things during duration Bob -> Max : something Max -> Bob : something else {end} Bob -> Alice : finish {start} <-> {end} : some time @enduml

Stereotypes and Spots
It is possible to add stereotypes to participants using << and >>.In the stereotype, you can add a spotted character in a colored circle using the syntax (X,color).
Edit online@startuml participant "Famous Bob" as Bob << Generated >> participant Alice << (C,#ADD1B2) Testable >> Bob->Alice: First message @enduml

By default, the guillemet character is used to display the stereotype. You can change this behavious using the skinparam guillemet:
Edit online@startuml skinparam guillemet false participant "Famous Bob" as Bob << Generated >> participant Alice << (C,#ADD1B2) Testable >> Bob->Alice: First message @enduml

Edit online@startuml participant Bob << (C,#ADD1B2) >> participant Alice << (C,#ADD1B2) >> Bob->Alice: First message @enduml

More information on titles
You can use creole formatting in the title.
Edit online@startuml title __Simple__ **communication** example Alice -> Bob: Authentication Request Bob -> Alice: Authentication Response @enduml

You can add newline using \n in the title description.
Edit online@startuml title __Simple__ communication example\non several lines Alice -> Bob: Authentication Request Bob -> Alice: Authentication Response @enduml

You can also define title on several lines using title and end title keywords.
Edit online@startuml title <u>Simple</u> communication example on <i>several</i> lines and using <font color=red>html</font> This is hosted by <img:sourceforge.jpg> end title Alice -> Bob: Authentication Request Bob -> Alice: Authentication Response @enduml

Participants encompass
It is possible to draw a box around some participants, using box and end box commands.You can add an optional title or a optional background color, after the box keyword.
Edit online@startuml box "Internal Service" #LightBlue participant Bob participant Alice end box participant Other Bob -> Alice : hello Alice -> Other : hello @enduml

Removing Foot Boxes
You can use the hide footbox keywords to remove the foot boxes of the diagram.
Edit online@startuml hide footbox title Foot Box removed Alice -> Bob: Authentication Request Bob --> Alice: Authentication Response @enduml

Skinparam
You can use the skinparam command to change colors and fonts for the drawing.You can use this command:
- In the diagram definition, like any other commands,
- In an included file,
- In a configuration file, provided in the command line or the ANT task.
You can also change other rendering parameter, as seen in the following examples:
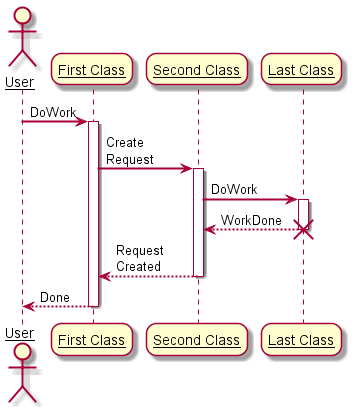
Edit online@startuml skinparam sequenceArrowThickness 2 skinparam roundcorner 20 skinparam maxmessagesize 60 skinparam sequenceParticipant underline actor User participant "First Class" as A participant "Second Class" as B participant "Last Class" as C User -> A: DoWork activate A A -> B: Create Request activate B B -> C: DoWork activate C C --> B: WorkDone destroy C B --> A: Request Created deactivate B A --> User: Done deactivate A @enduml
Edit online@startuml skinparam backgroundColor #EEEBDC skinparam handwritten true skinparam sequence { ArrowColor DeepSkyBlue ActorBorderColor DeepSkyBlue LifeLineBorderColor blue LifeLineBackgroundColor #A9DCDF ParticipantBorderColor DeepSkyBlue ParticipantBackgroundColor DodgerBlue ParticipantFontName Impact ParticipantFontSize 17 ParticipantFontColor #A9DCDF ActorBackgroundColor aqua ActorFontColor DeepSkyBlue ActorFontSize 17 ActorFontName Aapex } actor User participant "First Class" as A participant "Second Class" as B participant "Last Class" as C User -> A: DoWork activate A A -> B: Create Request activate B B -> C: DoWork activate C C --> B: WorkDone destroy C B --> A: Request Created deactivate B A --> User: Done deactivate A @enduml

Changing padding
It is possible to tune some padding settings.
Edit online@startuml skinparam ParticipantPadding 20 skinparam BoxPadding 10 box "Foo1" participant Alice1 participant Alice2 end box box "Foo2" participant Bob1 participant Bob2 end box Alice1 -> Bob1 : hello Alice1 -> Out : out @enduml
댓글