Ref. https://github.com/ipfs-shipyard/ipfs-desktop
A desktop client for IPFS.
You don't need the command line to run an IPFS node. Just install IPFS Desktop and have all the power of IPFS in your hands. Powered by Web UI.
Download the latest release
- Mac - IPFS-Desktop-0.11.4.dmg or brew cask install ipfs
- Windows - IPFS-Desktop-Setup-0.11.4.exe or choco install ipfs-desktop
- Linux - see the install section for available options
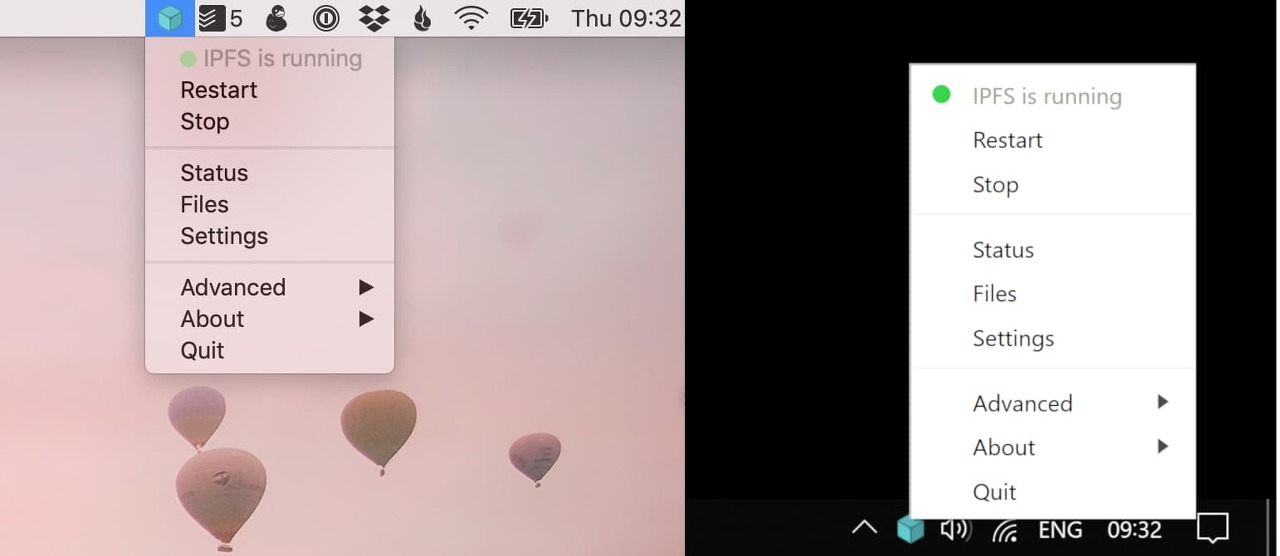


IPFS Desktop allows you to run your IPFS Node on your machine without having to bother with command line tools. With it, you have the power of Web UI on tip of your hands plus a handful of shortcuts you can find on settings.
⚠ Please note that this version is not stable yet and might change. Also, Linux support is still experimental and it might not work on every desktop environment. Please file an issue if you find a bug.
Table of Contents
Features
IPFS daemon always running
IPFS Desktop's main feature is to allow you to have the IPFS daemon always running in the background. But fear not! If you need to stop it, you can do it just by clicking on 'Stop'.
Handle ipfs://, ipns:// and dweb: links
IPFS Desktop has the capacity to handle protocols at the operating system level; i.e., if an application tries to open a link to either ipfs://, ipns:// or dweb:, then the OS will call IPFS Desktop, which will handle the link.
For example, if you come across a link on the Internet whose href attribute is ipns://ipfs.io, then IPFS Desktop will be able to handle it.
On Windows, an easy way to open a link would be to open the Run window (Win+R), paste the link, and hit Enter. Then, IPFS Desktop handles the rest. The same happens if you try opening the same link in a browser.
Adds ipfs to your system
If you're using macOS or Windows and don't have ipfs installed on your system, IPFS Desktop will automatically install it so it is available through the command line. If you're using Linux, or already have ipfs installed, you can tell IPFS Desktop to take care of it (and keep it up to date!) by toggling the option on Settings.
Easy add to IPFS
You can easily add files and folders to IPFS:
- On Windows, you can right click on files to add them to IPFS through IPFS Desktop.
- On macOS, you can drag and drop them to the tray icon.
Download copied hashes
You can enable, on Settings, a shortcut to download an hash on the keyboard.
Auto-add screenshots
You can enable, on Settings, a shortcut to take screenshots and add them automatically to IPFS.
Install
Download the latest release of IPFS Desktop for your OS, below.
PlatformDownload linkDownload count
| Windows | IPFS-Desktop-Setup-0.11.4.exe | |
| Mac | IPFS-Desktop-0.11.4.dmg |
We provide multiple experimental installers for Linux and FreeBSD:
PackageDownload linkDownload count
Or you can use your favorite package manager and a third-party package maintained by the community:
- Homebrew - brew cask install ipfs
- Chocolatey - choco install ipfs-desktop
- Scoop - scoop install ipfs-desktop
- Snap - snap install ipfs-desktop
- AUR - ipfs-desktop package maintained by @alexhenrie
Using package managers? Please head to our package managers page and help us add support for yours!
You can find releases notes and older versions on the releases page.
Install from Source
To install it from source you need Node.js >=12 and need npm >=6.1.0 installed. This uses node-gyp so you must take a look at their platform specific dependencies.
Then follow the steps below to clone the source code, install the dependencies and run it the app:
git clone https://github.com/ipfs-shipyard/ipfs-desktop.git cd ipfs-desktop npm ci npm start
The IPFS Desktop app will launch and should appear in your OS menu bar.
Translations
The translations are stored on ./assets/locales and the English version is the source of truth. Other languages are periodically pulled from Transifex, a web interface to help us translate IPFS Desktop and its components to another languages.
Releasing
- Bump the version in package.json
- Commit the changes
- Create a tag with the same version: git tag vA.B.C
- Publish local changes and the tag to GitHub repo: git push && git push origin vA.B.C
- Wait for the CI to upload the binaries to the draft release (a new one will be created if you haven't drafted one).
- Publish release draft.
- Once a release is published, users should receive the app update. See: https://www.electron.build/auto-update.
- The latest.yml, latest-mac.yml, latest-linux.yml files on the release are used by the app to determine when an app update is available.
- Update links and badges in README to point to the new version (A.B.C)
- Update Homebrew Cask.
- Update Chocolatey package:
- Wait for the artefact on the releases page
- Run node pkgs/chocolatey/update.js $version - this script will update a few files:
- Update the version number on ipfs-desktop.nuspec
- Update the binary URL on chocolateyinstall.ps1
- Update the SHA256 of the binary on chocolateyinstall.ps1
- Git commit with pubchoco in the commit message. Then CI should:
- cd pkgs/chocolatey
- choco pack - generates a .nupkg file.
- choco push $generated_nupkg --key $api --source https://push.chocolatey.org
- To start work on the next version, bump the version in the package.json
Manual notarization (Fallback in-case CI is not doing it correctly)
- Notarize .dmg at Apple (context: #1365)
- Download .dmg from https://github.com/ipfs-shipyard/ipfs-desktop/releases/vA.B.C
- Ensure APPLEID and APPLEIDPASS are set either as environment variables or entries in .env file. Those need to belong to the same org as cert used for signing.
- Run node pkgs/macos/notarize-cli.js ./IPFS-Desktop-A.B.C.dmg
- Debug errors by calling the tool directly: xcrun altool --notarize-app -f /path/to/IPFS-Desktop-0.X.0.dmg --primary-bundle-id io.ipfs.desktop -u XXX-from-vault-XXX -p XXX-app-specific-password-from-vault-XXX, also see the long list of hoops Apple might ask you to jump through.
Contribute

Feel free to join in. All welcome. Open an issue!
If you're interested in contributing translations, go to project page on Transifex, create an account, pick a language and start translating.
This repository falls under the IPFS Code of Conduct.
FAQ
Where is the configuration and logs?
The configuration file and logs are located on:
- Mac: ~/Library/Application Support/IPFS Desktop/
- Windows: %appdata%/IPFS Desktop/
- Linux: ~/.config/IPFS Desktop/
For quick access to this folders, just right-click on your tray icon and then 'Logs Directory' or 'Configuration File', depending on what you want.
Note for developers: When running dev version via npm start configuration will be placed in /Electron/ instead of /IPFS Desktop/ (~/.config/Electron/config.json on Linux). This is a known limitation of dev mode, does not impact packaged versions.
How do we select the IPFS repo location?
We use ipfsd-ctl, which, in default conditions, will check IPFS_PATH environment variable. If not set, we fallback to $HOME/.ipfs. As soon as the first run has succeded, we save the information about the repository location in the configuration file, which becomes the source of truth.
Which version of IPFS are we running?
Since we're using ipfsd-ctl, we have our own embedded IPFS binary. We try to always have the latest version.
Which flags do we use to boot IPFS?
By default we use the flags --migrate=true --routing=dhtclient ----enable-gc=true when running the IPFS daemon. They can be changed via the configuration file, which can be easily accessed as mentioned above.
Troubleshooting
No tray icon on Linux
The old tray interface on Linux called XEmbed is no longer supported by Electron and Chromium code used in the IPFS Desktop app (electron#21445).
This means people running custom setups may not see the IPFS tray icon unless they:
Does not start on Linux (Debian 10)
Some Linux users may see an error like this:
The SUID sandbox helper binary was found, but is not configured correctly. Rather than run without sandboxing I'm aborting now. You need to make sure that chrome-sandbox is owned by root and has mode 4755.
or a very short one, when starting in a terminal:
$ ipfs-desktop $Trace/breakpoint trap
This is a known issue with Electron/Chrome and some hardened kernels. If you are interested in details, read this.
The only reliable way to fix this at the moment is to start the app with additional parameter:
$ ipfs-desktop --no-sandbox
'Fundamental > Technical ' 카테고리의 다른 글
| Initialize your IPFS Repository (0) | 2020.08.07 |
|---|---|
| IPFS concepts (0) | 2020.08.07 |
| IPFS 설치하기 및 관련 정보 링크 (0) | 2020.08.06 |
| Introduction to IPFS: Run Nodes on Your Network, with HTTP Gateways (0) | 2020.08.06 |
| Managing Amazon SNS Subscription Attributes with AWS CloudFormation (0) | 2020.08.06 |

댓글