For some reason Apple do not make this a straightforward process. After I’ve created a new signature for my client I often spend a while on Skype guiding them through the process of getting it into Apple Mail. So, here’s a short guide. This guide is intended for people that do not use iCloud Storage.
1. The HTML
If you’re not sure about how to create a snazzy email signature then hire somebody to create it for you. They will know the limitations for creating a signature that looks great on all platforms. Ask them to provide you with the HTML with opening <body> and closing </body> tags as a .txt file (if they provide it as a .html file, then simply change the .html to .txt).
2. Create a signature in Apple Mail
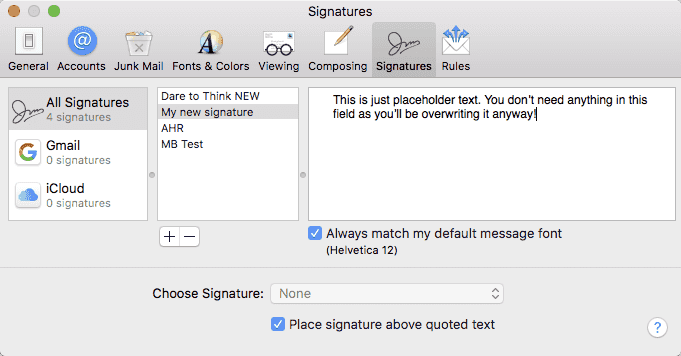
You need to do this so that your Mac creates a file, where you’ll then paste the HTML. Go to Apple Mail > Preferences… > Signatures and click the + button at the bottom of the second column (your signatures list).
Give your new signature a title and leave it at that (you don’t need to enter any text in the third (content) column, as you’ll be replacing this content later). Drag the signature (from the second column) on top of the email account you would like it to be associated with.
Quit Mail.
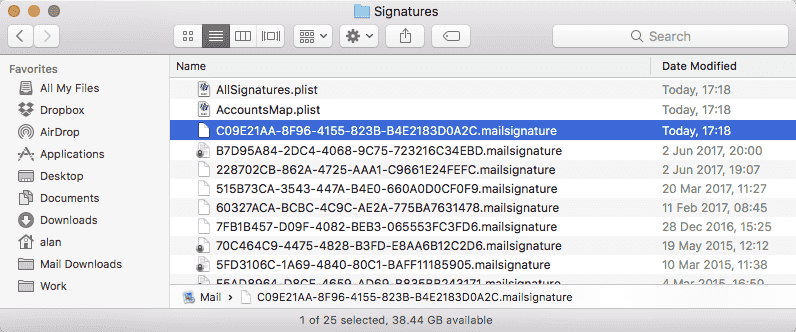
3. Open the Signatures folder

The quickest way of doing this is go to go your Finder and in the top menu bar click Go > Go to Folder… and enter “~/Library/Mail/” (excluding the quote marks). Now, you might see a few folders here. Select the latest “V” folder. For example if you see V2, V3 and V4 folders, open V4 (High Sierra is now V5, so open that one). Now open MailData > Signatures.
4. Paste the HTML Signature
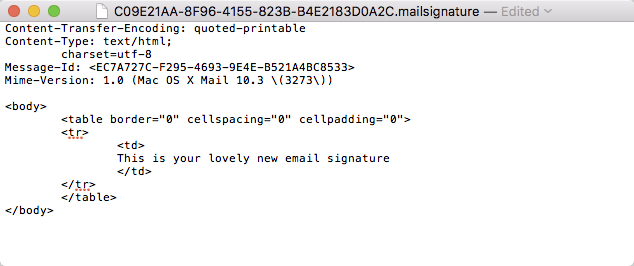
In the Signatures folder (if you’ve got a lot of files in this folder, view the folder as a list and order by the Date Modified column) locate the newest file that ends .mailsignature and will have a load of letters and numbers as the file name. Right-Click or CTRL-Click on the signature and choose Open With > TextEdit.
Delete all text starting from <body
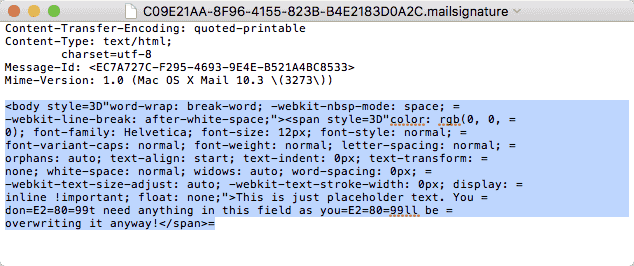
Open your new HTML Signature file (that your designer/developer provided) in TextEdit and copy the text (only copy from the start of, and including, <body> tag and ending at, and including the </body> tag and paste into position in the previous file you’ve just opened
Save, but do not close, the file.
5. Lock the file

Go back to your Finder, highlight the .mailsignature file and select File > Get Info and check the “Locked” checkbox.
6. Look at your lovely new signature!
Open Apple Mail and create a new email (File > New Message). Select your new email signature from the Signatures dropdown and there you have it!
Anything else…
Default Signature. If you would like this to be your default signature go to File > Preferences… > Signatures. Select your email account in the first column from the Choose Signature dropdown, select your new signature.
'Informatioin > Apple' 카테고리의 다른 글
| Code markup in Apple Notes app (0) | 2021.01.26 |
|---|---|
| How To Send Mail From the MacOS Terminal (0) | 2020.08.07 |
| Mac OS X 메이븐설치 (0) | 2019.08.08 |

댓글